Tighter tolerances refer to a smaller allowable difference between the dimensions of parts, requiring greater manufacturing precision. Industries like aerospace, medical, and automotive often need tighter tolerances due to the significant impact even small dimensional variations can have on product performance and safety.
Achieving tighter tolerances requires properly calibrated and maintained CNC machines, sharp cutting tools, and high-quality, consistent materials. Precision and accuracy in machine operation are crucial.
While tighter tolerances are sometimes necessary, they can increase manufacturing costs and time. Additional steps like multiple machining operations, inspections, and adjustments are often required. Therefore, it’s important to carefully consider the required tolerances for a project and balance them with cost and time constraints.
Typical Tolerances in CNC Machining
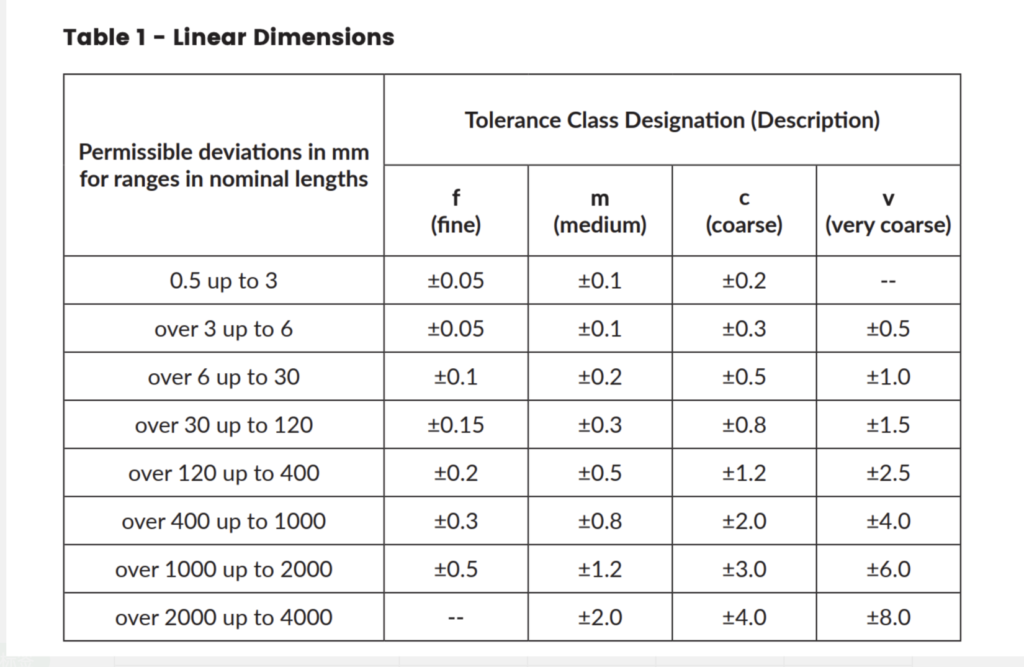
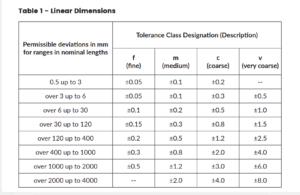
- Dimensional Tolerance: Acceptable variation in the size of a feature, usually specified as a range or limit, such as +/- 0.005 inches.
- Geometric Tolerance: Acceptable variation in the shape, orientation, or location of a feature, typically specified using symbols and modifiers like concentricity, perpendicularity, or position.
- Surface Finish Tolerance: Acceptable variation in the smoothness or roughness of a surface, usually specified using a roughness average (Ra) value or a surface finish symbol.
- Runout Tolerance: Acceptable variation in the circularity or straightness of a feature, typically specified as total runout or circular runout value.
- Positional Tolerance: Acceptable variation in the location of a feature relative to a reference point or datum, specified using a positional tolerance zone and a datum reference frame.
- Angular Tolerance: Acceptable variation in the angle between two features, usually specified using a tolerance zone and a reference line or plane.
- Form Tolerance: Acceptable variation in the shape of a feature, such as flatness, straightness, or roundness, specified using a tolerance zone and a reference surface or axis.
These tolerances ensure that machined parts meet required specifications and function properly in the final product.
CNC Tolerancing Basics
- Functionality: Choose a tolerance that ensures the part functions properly. If too tight, it may restrict movement or operation, leading to malfunction or failure.
- Cost: Tighter tolerances require more precise manufacturing and quality control, increasing production costs. Balance the required functionality with the cost of achieving it.
- Manufacturing Capabilities: Ensure the chosen tolerance is within the manufacturing process’s capabilities. If the process cannot consistently meet the tolerance, it may lead to high rejection rates and increased costs.
- Assembly and Compatibility: Consider how the part will be assembled and its compatibility with other components. Tolerances that are too tight may complicate assembly or cause fit issues with other parts, affecting the overall system.
- Design Intent: Take into account the designer’s intent and the part’s purpose. If the part needs flexibility or movement, the tolerance should accommodate that.
Overall, selecting the right tolerance requires careful consideration of functional requirements, manufacturing capabilities, cost implications, and design intent to ensure optimal part performance and cost-effectiveness.
High Costs for Tight Requirements
All these factors contribute to increased costs and longer lead times for machining operations:
Time and Labor: Tighter tolerances require more time and labor. Machinists need to carefully measure and adjust machine settings to ensure parts are machined within specified limits. This process can be time-consuming, especially for complex parts with multiple features and dimensions.
Risk of Rejection: Tighter tolerances increase the risk of parts falling outside acceptable ranges and being scrapped. Even with skilled machinists and advanced machines, slight variations can push parts beyond specified limits, leading to rejection and waste.
Special Jigs and Fixtures: Achieving tight tolerances often requires special jigs and fixtures to hold workpieces securely and accurately during machining. Designing and manufacturing these custom tools adds to the overall cost and lead time.
Specialized Measurement Tools: Very tight tolerances may necessitate specialized measurement tools for quality control. Standard instruments may not be accurate enough, requiring high-precision gauges or coordinate measuring machines (CMMs). These tools are expensive and need additional time for setup and calibration.
In summary, aiming for tighter tolerances in machining operations increases costs and lead times due to the additional time and labor, higher risk of part rejection, need for special jigs and fixtures, and use of specialized measurement tools for quality control.
Tolerances Depend on the Material
For example, if a plastic part needs to be machined to a tight tolerance, the heat generated during cutting can cause the plastic to warp or distort, making it difficult to achieve the desired tolerance. In such cases, a different material or manufacturing process might be necessary.
Similarly, some materials may cause excessive wear and tear on cutting tools, complicating the achievement of tight tolerances. In these instances, cutting tools may need frequent replacement, or a different material may be required.
Overall, the choice of material is crucial in determining the achievable tolerance range in manufacturing. Different materials have unique properties and behaviors that significantly impact the ability to maintain tight tolerances.
Inspection for tight requirements
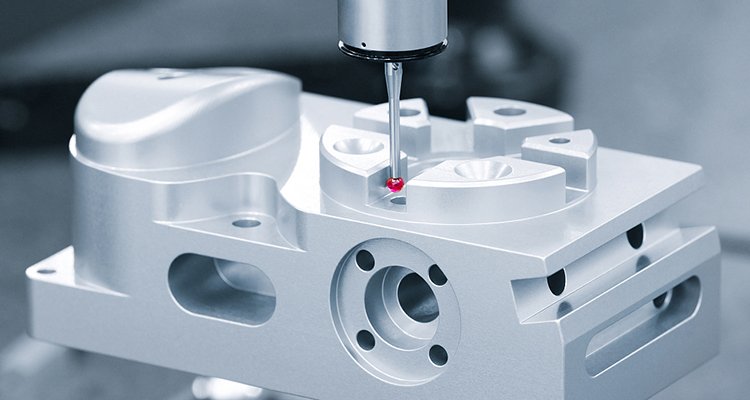
In addition to the cost of the equipment, the time required to inspect parts with tight tolerances is also increased. The operator needs to carefully measure and analyze each feature to ensure it meets the specified tolerances. This can be a time-consuming process, especially for complex parts with multiple features.
Furthermore, the inspection process itself can introduce errors. For example, if a part is not properly aligned or positioned during inspection, the measurements may be inaccurate. This can lead to parts being rejected or accepted incorrectly, resulting in additional costs and potential quality issues.
Overall, tighter tolerances require more advanced and expensive inspection methods, as well as increased time and attention to detail. This can significantly increase the manufacturing costs of a component.
Tolerances are crucial because they ensure parts fit together correctly and function as intended. For example, if a hole is machined too small, a bolt may not fit through it. Conversely, if a hole is too large, the bolt may be loose and fail to secure the parts properly.
Tolerances are also vital in assembling multiple parts. If one part’s dimensions are outside the specified tolerance range, it may not fit with other parts, causing misalignment or interference. This can lead to issues such as leaks, reduced performance, or even complete product failure.


